Exposure (Beetleweight)
This page shows the entire build process for our beetleweight vertical spinner Exposure.
Beetleweight WIP 15/12/23
In my last post, I mentioned that I was planning on building my own beetleweight robot- and I have started to do just that! Here I will tell you what I have accomplished so far.
My Design
My idea for this robot is a 4 wheel drive robot with a large vertical spinning disk at the front. The robot will be longer than it is wide, and will hopefully be able to drive upside down (although the weapon won't be able to spin if it does).
What We Bought
For this project we bought the 'Beetleweight Brushed Drive Kit' from the Bristol Bot Builders website along with an extra set of wheels for my design. We also purchased a 3S LiPo battery, a charger, and a fireproof guard to charge the battery in. We got screws, bolts and other useful things to hold the robot together. For building a prototype version, we got a few plastic chopping boards of varying thicknesses to build a temporary frame. We also needed a transmitter, so we bought a Flysky i6 transmitter.
Building The Prototype
We measured and cut a base piece 210 x 125 mm out of a 3mm thick chopping board. We then attempted to cut the side pieces (205 x 30mm) and supports (105 x 30mm) out of 7mm plastic. At least, we thought it was plastic when we looked at it, however it turned out to be MDF, which was surprising! My design has the drive motors mounted at the back of the robot, so we tried to drill 22mm holes into the MDF to allow them to fit in. However, as MDF is basically glorified cardboard, one of the pieces broke when we attempted to drill the holes. After re-cutting a side piece, we began to screw the frame together. Unfortunately, the pieces weren't perfectly cut so nothing quite lined up and, as a bonus, the MDF pieces began to split when we tried to screw them together.

Coming back the next day, we re-cut the side pieces and supports out of real plastic, even cutting the side panels to have some of the angles that would be in the final design. This time, nothing broke when we screwed it together. Using M4 bolts, I attached the unpowered wheels. This prototype is going to have four wheels but only be two wheel drive for now. After successfully building the frame and mounting the drive motors, it was time for the electronics.

We attached the motor ESCs to the motors (cable ties, for now) and connected them to the breakout cable with terminal block connections along with the safety LED, which is temporary for this prototype. Then we needed to solder! First, we soldered the wires that connect from the battery to the breakout cable, via the removable link that is necessary for all robots. Then we soldered the pins onto the receiver, and attached one of the BEC wires to the receiver. Finally, we soldered the ESC wires onto the motors and paired the robot to the transmitter.

Testing
Here is the test footage. All that this prototype needed to do was drive, and I think it did that quite well! It was reasonably fast, turned well, and was quite easy to control. I am very proud of our progress, and look forward to the finished result!
More Progress! 21/01/24

Our next step was to cut the rest of the chassis pieces out of 7mm chopping board. We cut a battery compartment piece and the two weapon supports out of this, then cut a lid and back panel out of 5mm plastic.The next thing we did was mount the wedge pieces and bolt the forks to them. The wedges are the same 7mm plastic as the chassis, and are held on to the side panels and the weapon supports with countersunk screws. The forks are corner braces bought from B&Q and bolted to the wedges so they can be removed if needed. They are also bent out slightly so they can run along the floor.

We turned our robot to four-wheel drive with the help of four plastic pulleys we found and drilled to fit to the motor shafts at the back and the M4 bolts at the front. The transmission was provided by two identical elastic bands. Not perfect, but still an improvement on the previous two-wheel drive!

After this we ordered a large number of things, including our brushless motor and esc, and weapon and drive pulleys from the Technobots website. These purchases also included a length of polyurethane belt for the drive and weapon systems. When our Technobots order arrived, we started to fit the drive pulleys. We ordered 30mm diameter V pulleys, so we needed to drill the centre holes to fit onto the motor shafts and bolts. For the front wheels, our previous technique of gluing the pulley to the wheel hub didn't work with these pulleys, so instead we bolted the wheel and pulley together so it cannot come undone. At the back, the wheel and pulley are unconnected but this might change in the future. As for the drive belt, we cut two equal lengths from it and then held both ends over the hob and stuck it together. The belt fits on nice and tightly, and makes the robot much easier to drive.
This is a lot of progress towards a finished build, and I am very proud of this so far.
More Progress 6/03/24
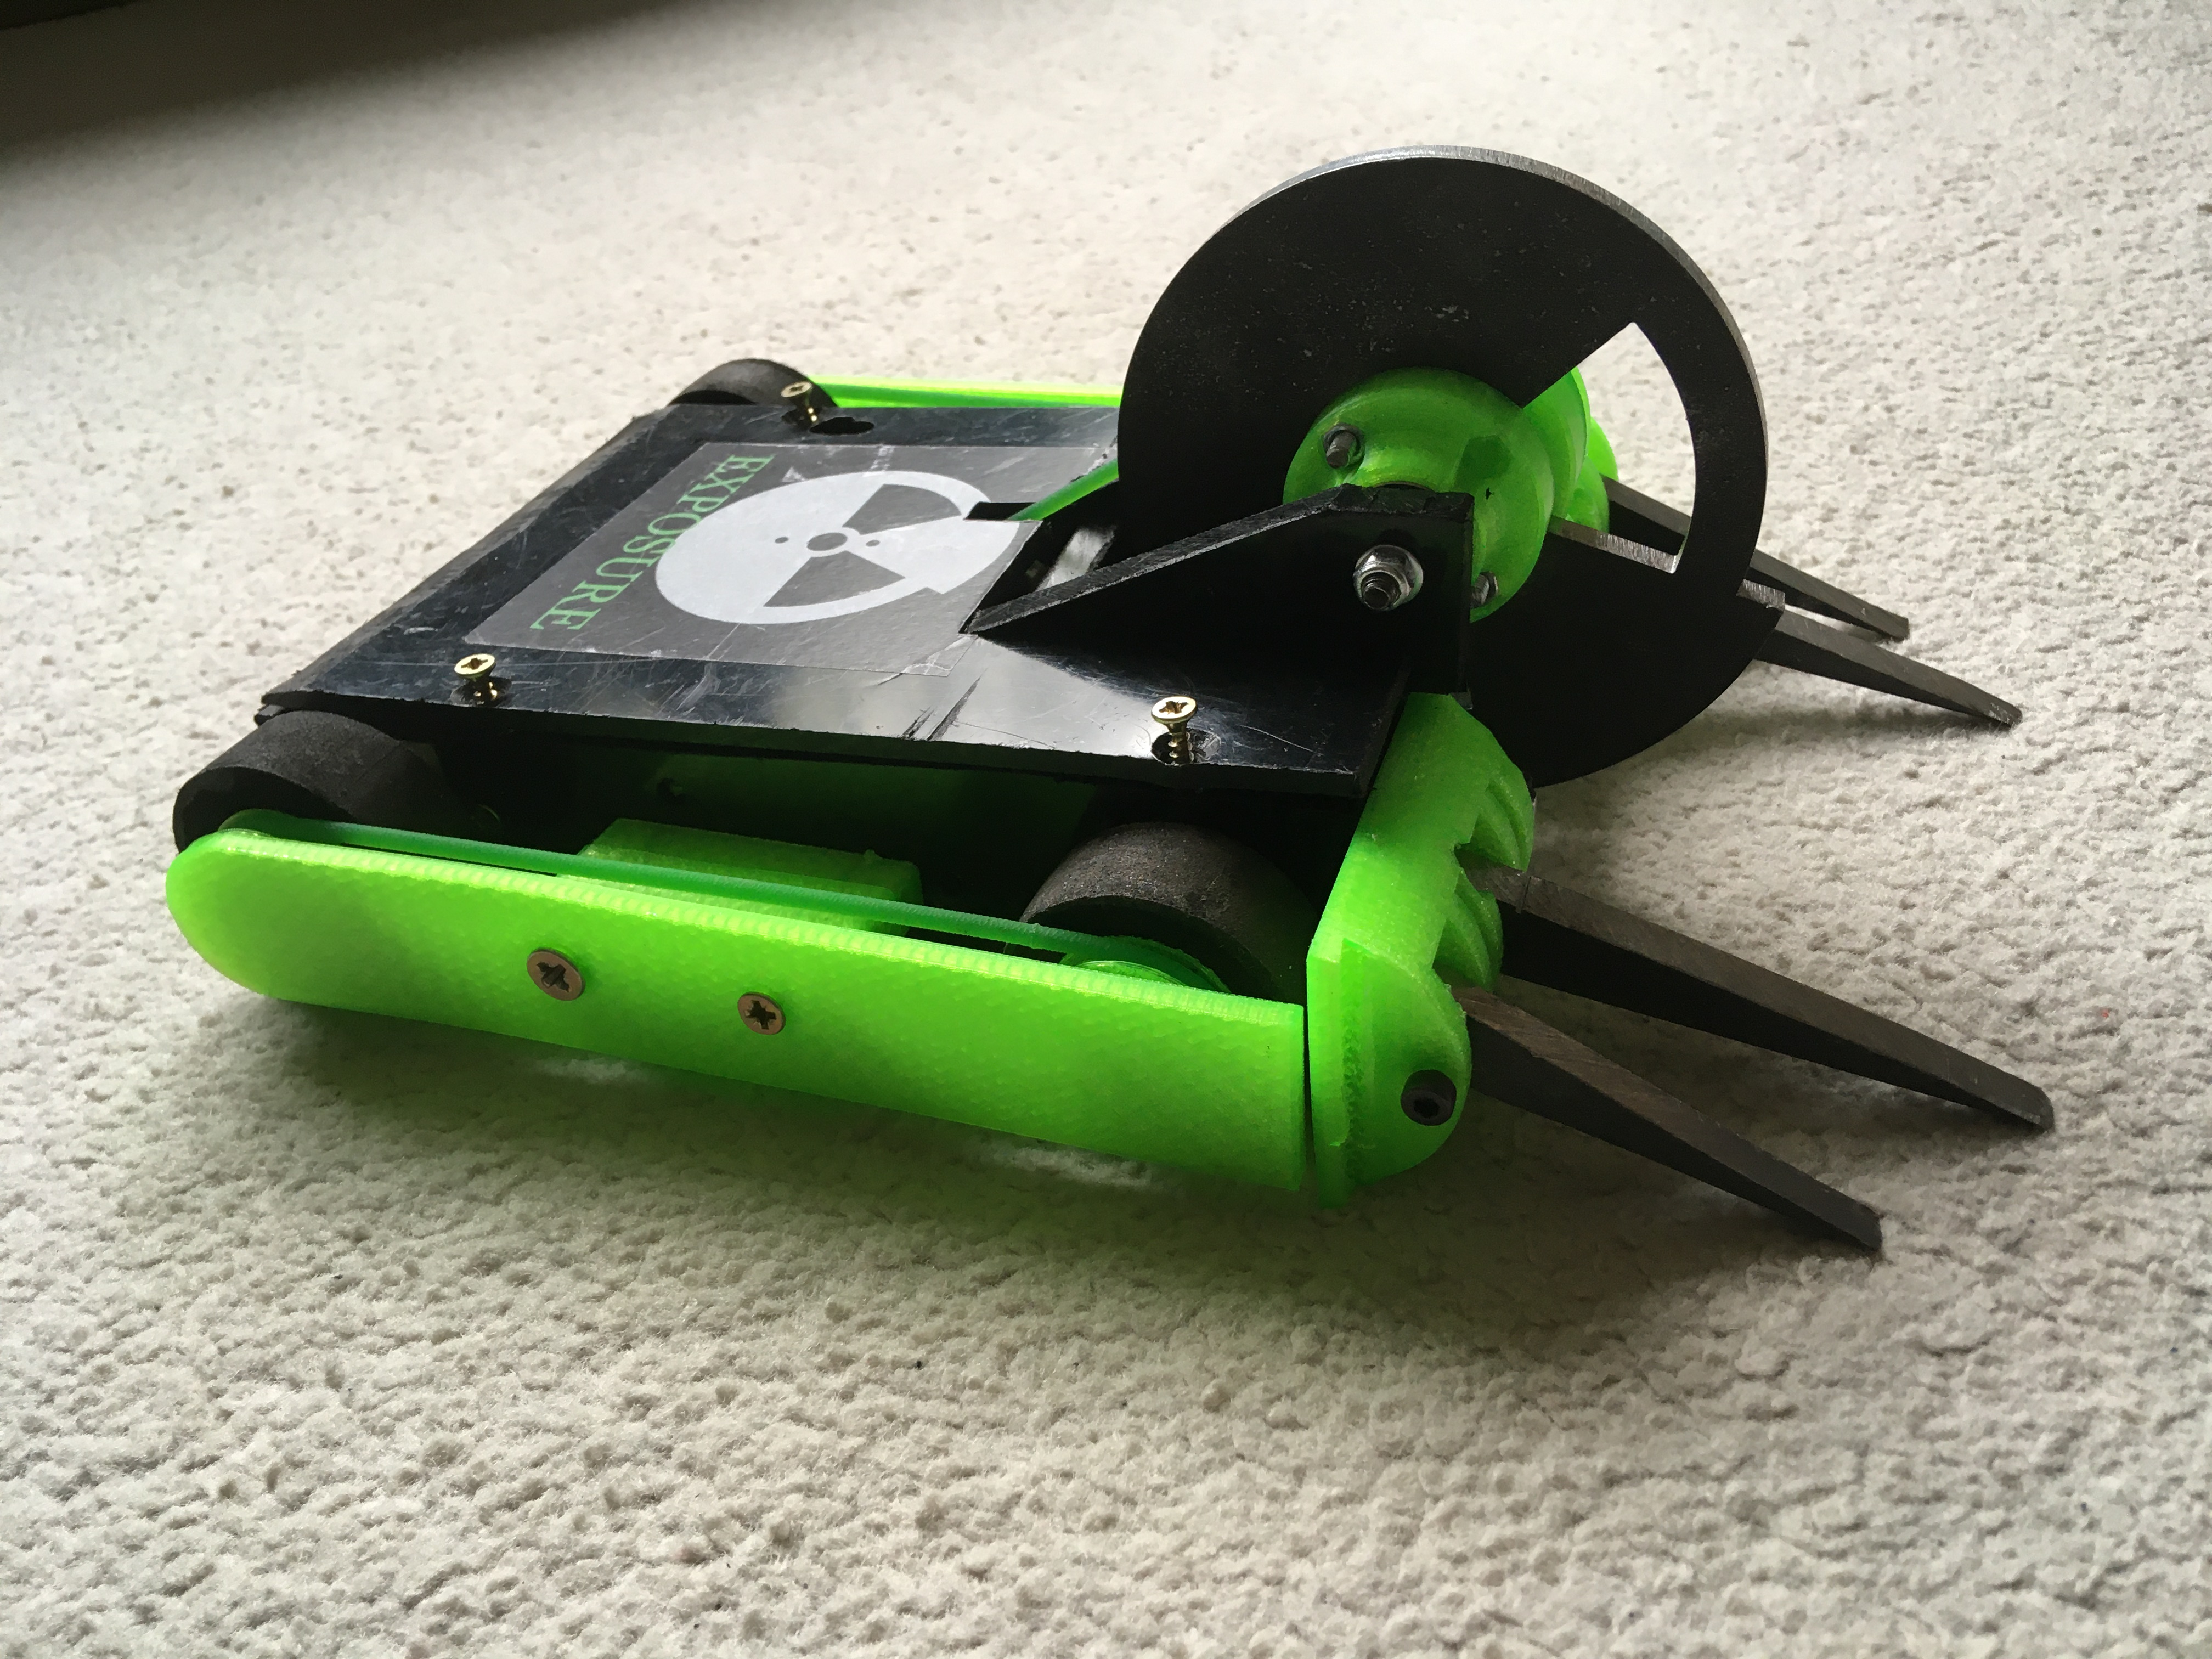
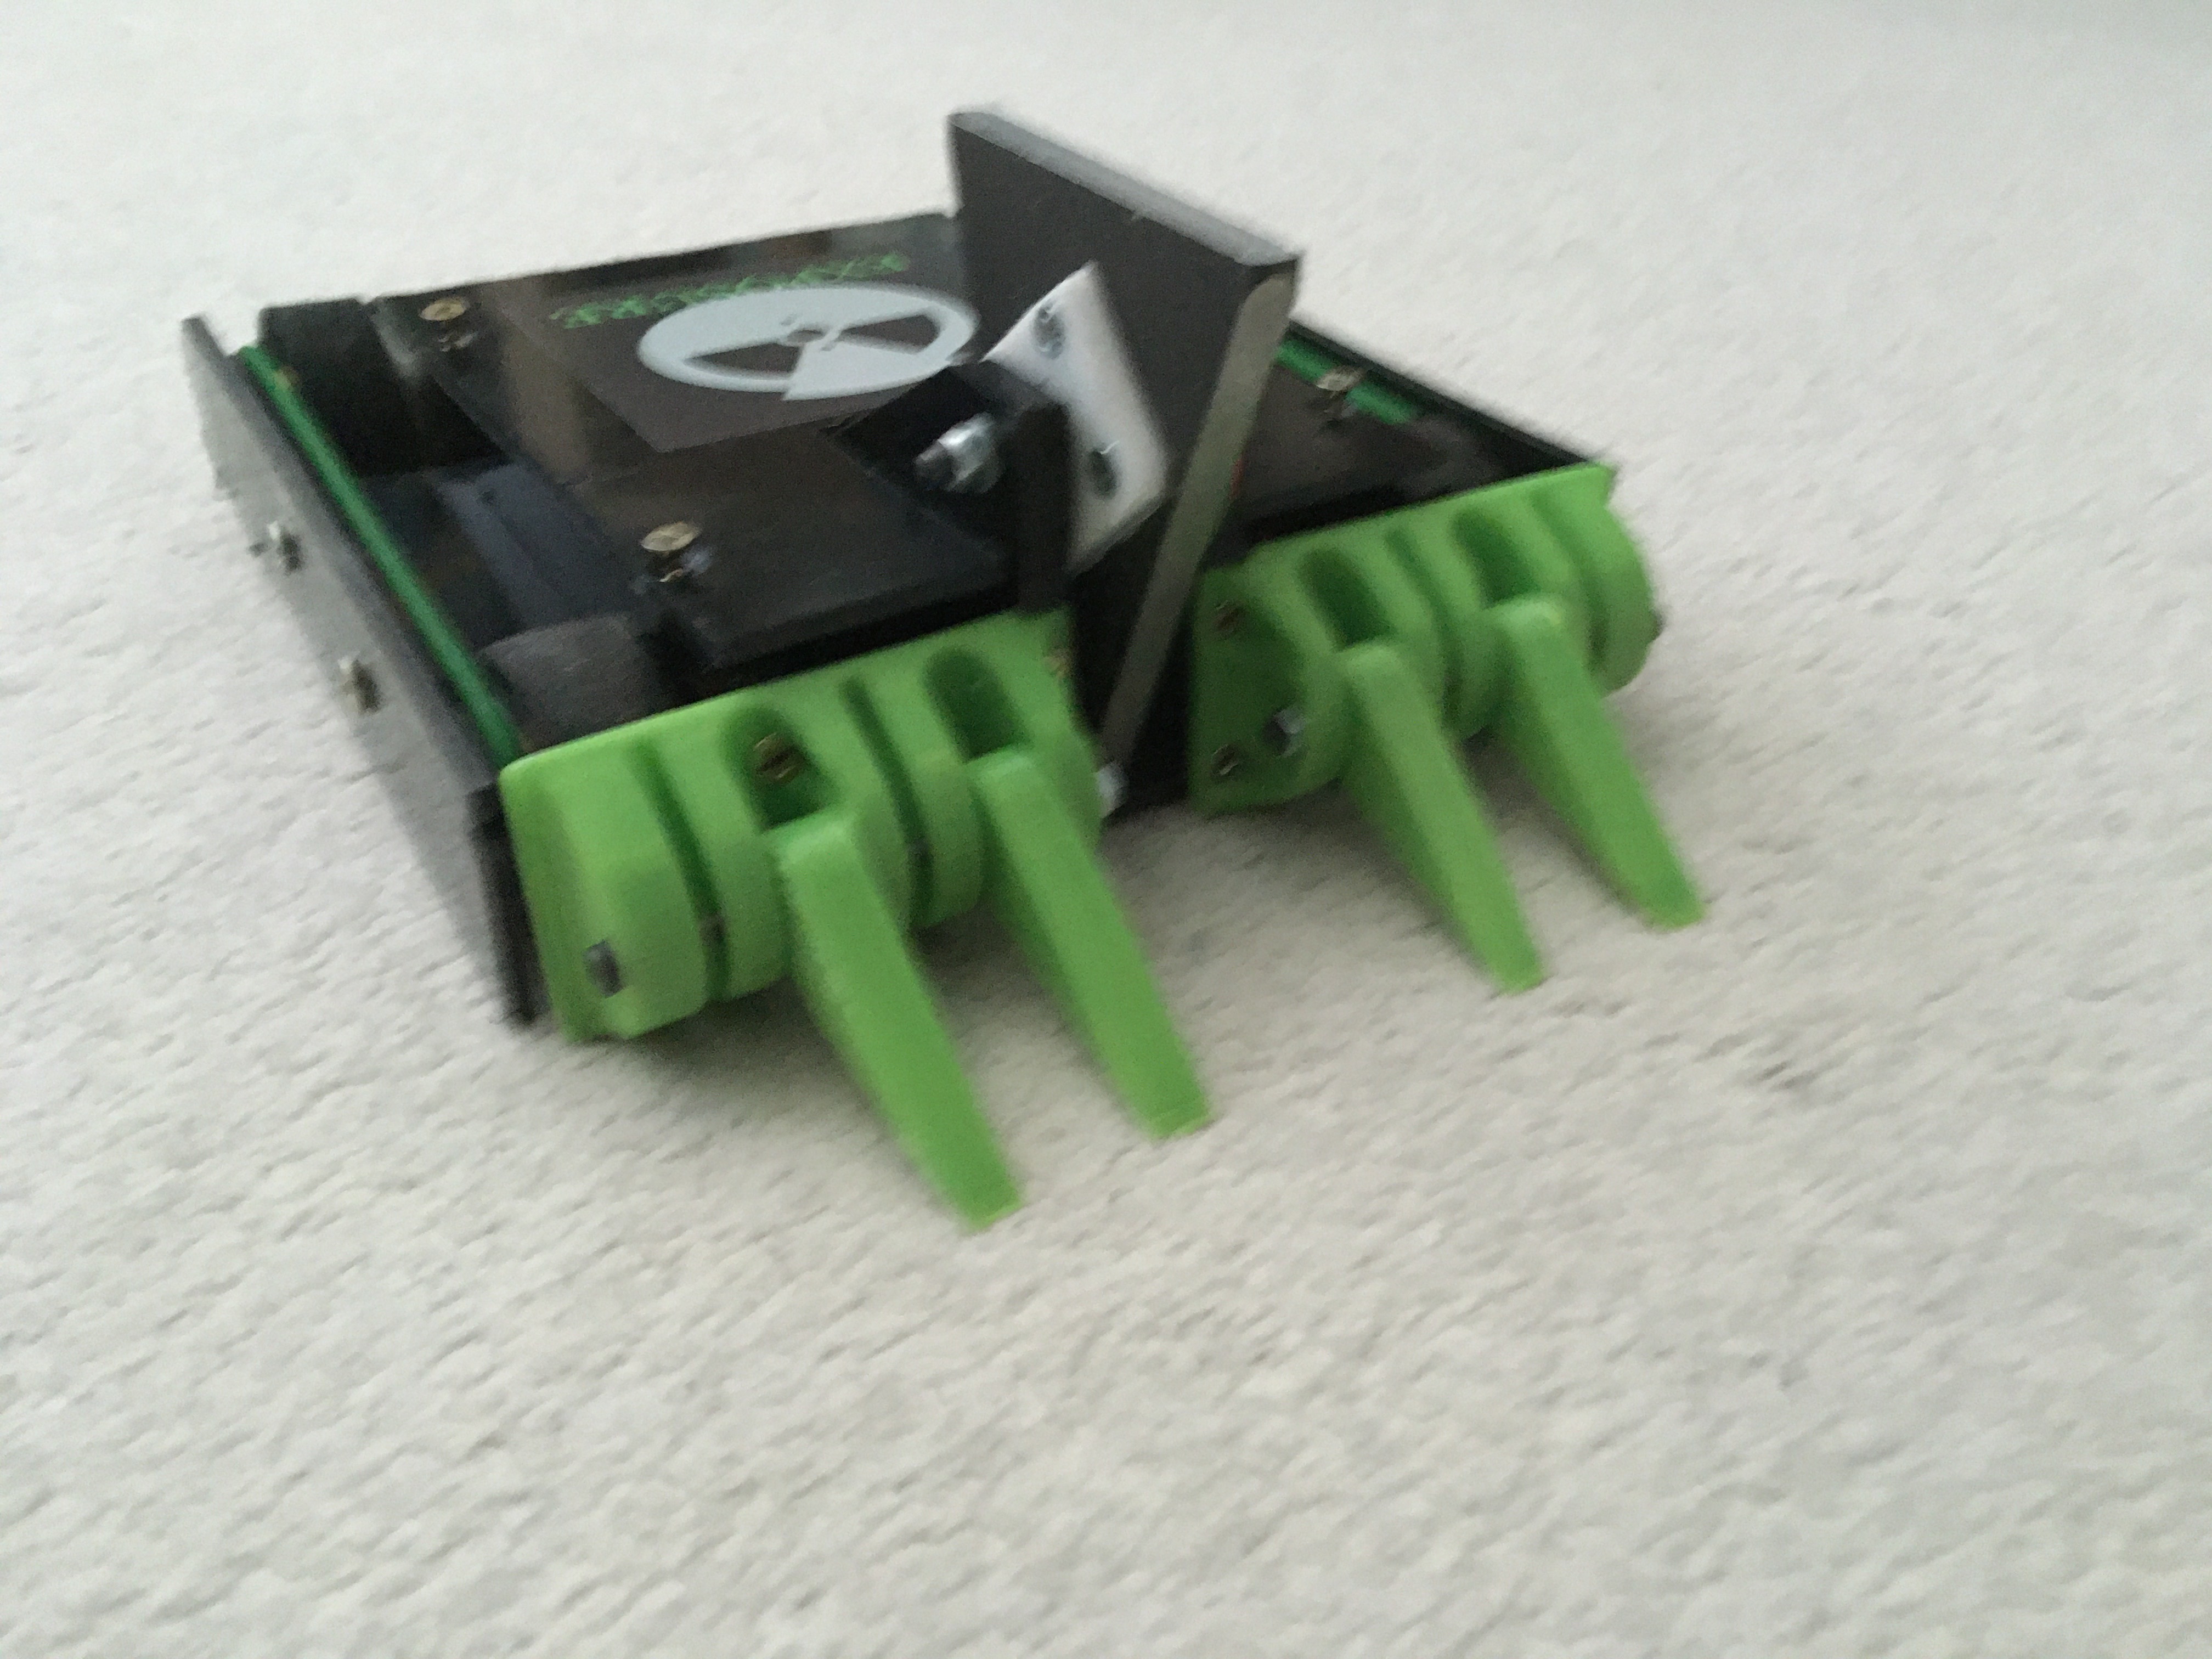
A lot of progress has been made recently, most notably the pieces have been cut from black HDPE and assembled fully. The weapon motor has been mounted, and a mock weapon has been cut from a spare piece of plastic. It was quite easy making the final pieces, as we already knew the exact dimensions and how everything needed to fit together so it was just a matter of carefully cutting all the pieces and then screwing them together. Then we assembled the weapon stack. This consists of a 40mm pulley, with 4 M4 bolts running through it and through the weapon, which has bearings pushed into a 12mm central hole, and then the bolts screw into a plate with M4 nuts pushed into it. Then a 6mm shoulder bolt runs through all of this, plus the weapon bulkheads, and finishes with a nylock nut.
BBB Brawl
I was lucky enough to take a trip to the recent BBB Brawl event, and was even more fortunate that I could participate in whiteboard fight after the main competition! I was in a fight with Gruyere, Meanie Mouse, and Killjoy. This was the first time driving and spinning the weapon simultaneously, and also the longest amount of time for either. The fight highlighted some issues, such as the long wheelbase making turning slow, and the bare foam wheels not getting enough grip on the arena floor. This will be solved by a few layers of rubber cement on the tyres. However, everything worked! It drove, the weapon span, and although it was only plastic it proved that the concept worked. The wheels were quite easily removed by Meanie Mouse, a problem caused by the wheel hubs not having enough shaft to clamp on to, which has (hopefully) been fixed by moving the pulleys to the outside and giving the wheels more shaft length. Also, the forks, which were just corner braces bolted to the wedges and bent downwards, got bent upwards with ease.
Future Improvements
I have now designed forks to be hinged from a front mounting piece. These, along with the two weapon designs, are going to be laser cut and ready for assembly by the end of the month. The mounts for the forks are going to be 3D printed and have a 4mm shoulder bolt running through them to hinge the forks. I designed the mounts to hold 3 forks each, and the two forks designs will allow for a lot of interchangeability with the ground game. I really feel like this project is nearing being finished, and we will definitely be ready for our trip to Robodojo in April.
Updates! 04/04/24

Since BBB Brawl, a lot of work has gone into this robot. This includes the purchase of an 8mm thick bar of mild steel, which was cut, by hand, into a spare weapon for testing and as a backup. The offcuts from this piece were cut and drilled into two sets of long, 8mm thick forks. The 3D printing was successfully done in high-infill green TPU, giving us the fork mounts, four wedgelets to counter drums, and the sharp edge protection for the Hardox weapons and forks, which have not yet arrived. It is unlikely that the Hardox will arrive before we leave for RoboDojo tomorrow, meaning we will have to use the mild steel weapon at the event. The preexisting HDPE wedgelets have been given an angle to save some weight and will remain as the anti-horizontal setup.


Following the wheels taking damage at Bristol, one of them has been replaced as it was slipping quite a lot and all have been given a few coats of rubber cement to improve traction. They have also been covered by wheel guards, of which we made six as they are likely to be damaged during fights. A sticker with the name of this robot, Exposure, has been made with the design of the Hardox disk on it and put on the back to easily identify it.

Testing
This test video was taken before the forks were mounted onto the robot, and the weapon was running on about 30-40% throttle for safety. This footage was taken through the polycarbonate lid of a test box, and we were standing back when the robot was moving. We also tested against the prototype chassis that we made, and it shattered one of the weapon mounts and hit it into the ceiling multiple times! It is clearly capable of giving out some big hits!
RoboDojo 09/04/24
We took a trip to York at the weekend to compete in our first official event as a full competitor. Upon arriving at the venue, we realised we would have had no chance of finding it if we didn't have Thomas Yau there to point us into the right building! We were among the first to arrive, so we had time to set up and grab some space before the rest of the competitors, and spectators, arrived. With a total of 31 antweights and 12 beetleweights, there was barely enough space for everyone to work on their robots. The competition format was a sort of group stage format so everyone got 4 guaranteed fights but could have more in the form of playoffs.
Fight 1: vs Baby Dead Bod
This was an absolutely terrifying first fight to have, Baby Dead Bod is an immensely powerful horizontal spinner so I was not happy to face it this early on.


Upgrades 06/05/24
Our trip to Robodojo earlier this month highlighted a few issues that needed to be resolved. Most of these problems were to do with the weapon assembly, which had way too much flex and caused us to lose the weapon in our first fight. Also, the 3D printed parts were PLA at the event (uh oh) so they needed to be re-printed in TPU with a slight redesign for some parts. The fork mounts needed a way to stop the forks rotating under the robot like they did in York, and the weapon spacing needed to be increased. After looking at different companies that could print what we needed, we decided that it would be easier (and probably more cost efficient) if we bought our own 3D printer and TPU filament. This also opens up a lot of opportunities for printed antweight and beetleweight chassises.
The first step for improving the weapon was to move the weapon bulkheads outwards and extend them backwards to the piece that separates the drive motors from the rest of the robot. We changed the mounting position of the weapon motor to be behind the weapon and inside of the bulkheads. This helped with internal space and also meant that the motor and pulley had no chance of being hit again. The battery has swapped sides and has moved up along the outside edge of the left weapon bulkhead near the link. The weapon ESC and receiver are on the right side, with the breakout cable in the centre so that all of the components make a sort of 'U' shape around the weapon
We then printed a slighter bigger pulley and bolted it through the weapon into a piece holding two M4 nuts and pressed a 6 x 19 x 6mm bearing into each side. The increased distance between the bearings helps eliminate the flex that the weapon had in the earlier version. We have both weapons assembled like this so there is no need to take the entire weapon assembly apart for every swap. Just take the shoulder bolt out, and slide the new weapon on. Speaking of shoulder bolts, longer ones were ordered to fit the new assembly, we made a new belt to cover the extra distance.


Here is the full event video, I will write the timestamps for each fight.
BBB x LHG Summer Showdown 2024- All Fights - Bristol Bot Builders Beetleweight Combat Robots
The venue for this event was lovely, however the constant rain was a bit annoying, especially when it dripped off the marquees down the back of my neck!
We arrived at the venue and went into the tech check with the heaviest setup we could run, and passed safety with no issues.
Fight 1: (06:46)
My first fight was against Om Nom and Carbon Copy. I was happy with this match up as I would be the only spinner against a grabber (?) and a cluster bot. The fight began and I quickly engaged with one of the halves of Carbon Copy, using my full weight to push it into the wall and slice some material off the front wedge. I then reversed to give myself a bit of a run up and hit the cluster again, this time ripping the wedge off and slamming it into the ceiling. Whilst this was happening, Om Nom had somehow gotten stuck with mouth open, so was counted out. I then got ganged up on by the Carbon Copies, who nearly managed to flip me over, so I hit the pit release button and got a push, sending one half down the pit. however due to the belt not being tight enough, it had slipped off leaving me to just push the other half and wait for a judge's decision, which I won! I had finally won a beetleweight fight!
Fight 2: (25:12)
Oh well done, you won a fight! Now go fight Baby Dead Bod (again). Oh well. This fight was very quick. Due to the pit being broken earlier, it was stuck halfway down, and of course, I ended up straight in there. BDB ripped straight through one of the wedges completely, which was given to Thomas after the fight. I was actually quite relieved to lose this way, because it meant we still had a robot for the third fight. Speaking of which...
Fight 3: (43:20)
My final fight was against Ray, an adorable fox themed lifting wedge. The fight started with Ray box rushing me, but sort of bouncing off and landing upside down. I came round for the easy hit and ripped one the paws off. Ray was still upside down unable to move, and my weapon belt had snapped and flew away, so I didn't do the smart thing and take the KO, I hit them back over and carried on. The rest of the fight was a very pushy driving match, with Ray nearly inverting me a few times, but the forks did their job and I managed to squeeze and judge's decision win! That's right, two wins in one event!! I am so happy with this performance, and got an awesome picture and a Ray plushie!


Comments
Post a Comment